This article contains affiliate links, and any purchases made through those links may result in a small commission.
Rustoleum® EpoxyShield Blacktop Patch & Crack Filler is an industrial grade blacktop patch that we're trying for the first time in order to repair some holes and cracks in our asphalt driveway. The EpoxyShield was easy to mix, easy to work with, and dried quickly. Hopefully it will hold up to the harsh Northeast winters.
We live in the Northeast and due to the snow and ice nobody up here uses gutters. They'd fill with water and the weight of the frozen water might rip the gutters off the house, sometimes taking half the fascia with them. The blocked gutters also contribute to ice damming.
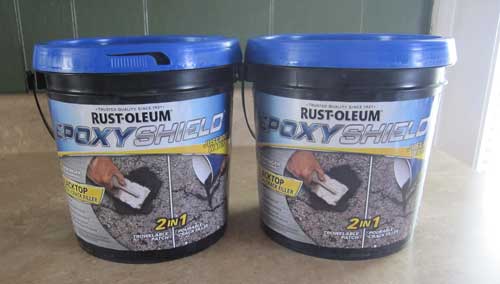
Our house has a simple gable roof and the eaves run parallel to the driveway so the rain, ice, and snow melt drips off the eaves and onto the driveway. We've patched it every year or two with the sand/asphalt mix from Lowe's and/or Home Depot and that works okay, but doesn't hold up well to the constant snow shoveling in the winter. This year we're going to be sealing the driveway with the Rustoleum EpoxyShield Driveway Filler and Sealer so we decided to try the EpoxyShield Driveway Patch & Crack Filler instead of the sand/asphalt mix. The image below shows two ten-pound containers of the Epoxyshield driveway patch:
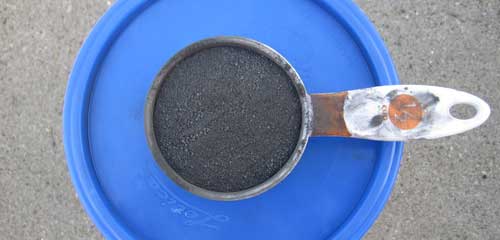
Rustoleum EpoxyShield Blacktop Patch is a granulated powder that gets mixed with water according to the mixing chart on the back of the container. There are directions for mixing a quarter-tub, half-tub, and a full tub for both patch consistency, and crack filler consistency (which uses slightly more water than the patch mix). We did a trial run with a quarter tub to become familiar, then went to mixing half tubs. When mixing the EpoxyShield, you need to add the water to the mixing tub first, then add the powder to the water. The EpoxyShield has a black pigment in the powder so it will match the driveway when it dries, and that pigment will stain almost anything so use caution when first opening the container. The powder is loose in the container and some powder may be on the lid, so open the tubs on some newspaper or an old pillowcase.
The Rustoleum EpoxyShield Driveway Patch is Made in America as is the container. It has an easy-open lid and both the lid and container are recyclable. They claim a soap and water cleanup, but you need to clean all spills right away due to the pigment. The image below shows the EpoxyShield powder:
According to Rustoleum, the EpoxyShield can be used on cracks up to 1/2" wide and holes up to 1" deep. If the holes are deeper than 1" you can add sand or pea gravel as filler before topping it with the EpoxyShield, but they recommend applying no more than 1" of EpoxyShield in any single application. Depth wasn't an issue for us because our patching job consisted of wide shallow areas - about 3/4" deep and between 6" to 14" wide. There was only one narrow crack which wasn't very deep. The official coverage from a 10-pound container is two-foot square by 1/2" deep and that seemed to be about right although we didn't actually do the math.
These are the minimum tools and supplies needed for applying the EpoxyShield patch and crack filler:
These items are optional:
A quick note about the paintbrush, roller, or sponge - we used water and a paintbrush to feather the edges and a roller to smooth the patch, but this will affect the final color of the dried patch because spraying water on the edges dilutes the pigment so it will dry lighter than the center of the patch, and some of the pigment will stick to the roller so the center of the patch will also dry lighter than normal, but darker than the edges. We're sealing our driveway so it didn't matter, but if you're not sealing your driveway, you may want to skip the paintbrush, water, roller, or sponge and just use a trowel.
Almost all the driveway repairs involved patching wide shallow areas. The Epoxyshield was easy to apply and dried to foot traffic in about an hour at 70° in mostly shade (our driveway is on the north side of the house). Double-check the weather reports because the EpoxyShield needs 24 hours of dry weather otherwise all the pigment will get washed out and it will dry to a light gray color. Don't mix more than you can use in one hour's time, but if you're patching wide shallow areas, 45 minutes is more realistic depending on the temperature - the warmer it is the faster the EpoxyShield will setup. You can seal the driveway after allowing the patch to cure for 24 hours.
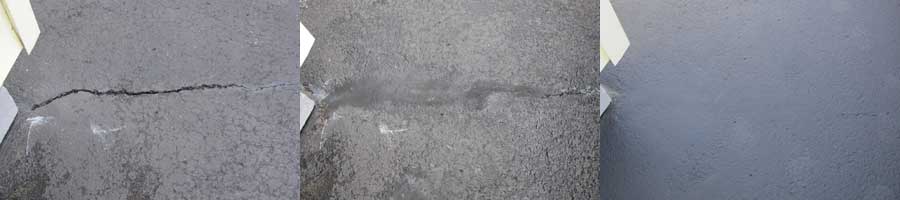
Here's a before-and-after pic of one of the patched areas. It was tough to get a perfectly matched photo due to changes in light and weather, but it should give you a good general idea of the finished patch:

There was only one crack that needed to be filled with the EpoxyShield - the others were hairline cracks so liquid blacktop filler was used. The crack filler was easy to pour using a measuring cup, and the condiment bottle might be handy to have for narrow cracks. A note about mixing - if you mixed a batch for patching and have some patch mix leftover, you can't just add more water to the patch mix to thin it down to fill cracks. That's something Rustoleum calls retempering and they advise that you mix a new batch using the correct powder to water ratio. Here's a before-and-after pic of the driveway crack:
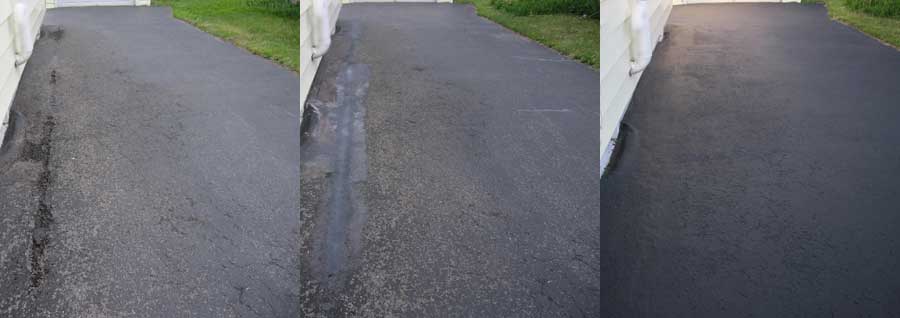
Here's a before-and-after pic of the finished driveway after it was patched with the EpoxyShield Driveway Patch and sealed with the Rustoleum Blacktop Filler and Sealer:
The Rustoleum EpoxyShield isn't as readily available at brick-and-mortar stores as other driveway patches. The Rustoleum website has a Store Finder, but make sure you call ahead to see if it's in stock. The driveway patch is fairly easy to find online but we narrowed the choices to Amazon and Home Depot. The price was cheaper at Home Depot, but you have to buy a case of two 10-pound containers and the only free shipping was to the store which meant gas and time. We definitely needed two tubs so went with Home Depot the first time, but ended up needing a third tub and for that we went with Amazon even though the price was slightly higher. It was delivered right to our door (no gas, time, or coordinating with Home Depot) and we only needed to buy one container. Each container had an expiration date and the expiration dates from Home Depot were twelve months, and the one from Amazon was eleven months.
This first winter the Epoxyshield held up well to the constant snow shovelling and eventual ice melt drip. The smaller cracks (second set of before/after pics above) will need to be refilled but the larger cracks don't need to be redone, and filling the large cracks was the main reason for trying Rustoleum in the first place, so we're happy with the Epoxyshield's performance.