We've grown fresh green beans before, but this year we decided to try growing dry beans. Dry beans are grown just like regular fresh beans, and the only real difference is the maturity of the plants when they're harvested. Dry or dried beans (sometimes called shell beans) are a good source of protein, B vitamins, calcium, and minerals such as magnesium and potassium. They're high in fiber and low in fat and cholesterol, making them a heart-healthy addition to any diet. There are many dry bean varieties to choose from, but we went with "Calypso" dry beans from High Mowing Seeds.
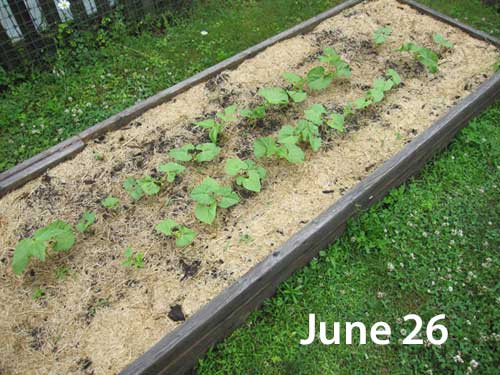
Dry beans seeds are direct-seeded into the soil and prefer warm temperatures. We're in chilly Zone 5 so we had to wait until the soil warmed up at the beginning of June before sowing the seeds into the raised bed. The seeds were planted in a 3' x 8' raised bed that gets at least 14 hours of sun each day. The seed pack recommends planting the seeds 2-3" apart with rows spaced 28-36" apart, but since the bed is fairly narrow, we planted the seeds in a staggered pattern of 4-5" apart so there was one double row. The image below shows the seed spacing for the beans:
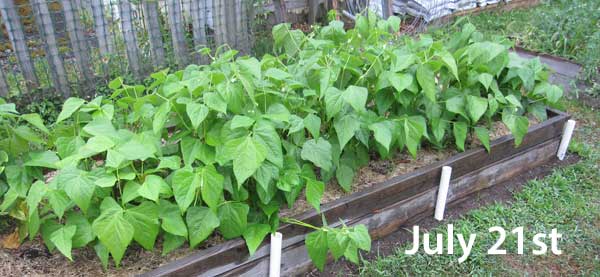
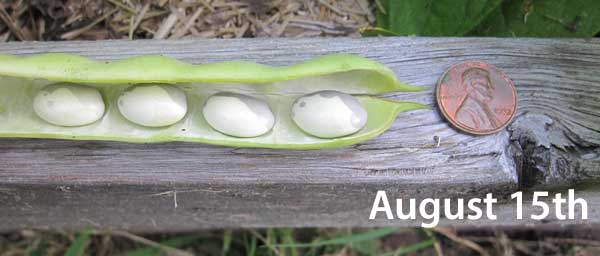
The seed pack said the beans only grew to 15" so no staking or support was put in place although they did start to lean over towards the end of the growing season which caused some of the pods to end up sitting in the moist dirt as they matured. The summer was blistering hot so the beans were watered from below several times throughout the summer. Our soil is a loamy sand and drains very well so we always use a straw mulch on all our crops to conserve moisture and keep down weeds. The bed was prepped with Happy Frog's All Purpose fertilizer a few weeks before sowing the seeds, and that's the only fertilizer the beans received. There wasn't any major problem with pests - a few aphids early on and some grasshoppers at the end, but the plants were strong enough that they didn't suffer much damage. The first image shows the bean plants on July 21st, and the second image is from September 8th, and the third image shows the beans on August 15th when they were just starting to turn black and white.

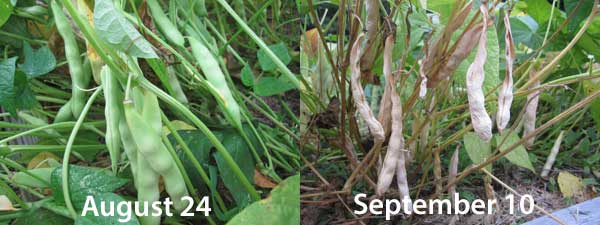
The bean crop matured at different times over the season, starting at around 90 days and continuing for another couple of weeks. It's very easy to tell when dry beans are ready to be harvested. The leaves start to turn yellow then drop off, the pods go from green, to pale yellow, to beige, and then start to shrink around the mature beans as they lose moisture. The pods end up looking a bit like parchment paper. Dry beans can't handle frost, but you can pick the rest of the almost-mature pods off the plants and spread them on a screen to finish drying. We didn't have the space for that so once frost arrived, the remaining plants were pulled roots and all and we used one of our garlic drying racks to hang the last of the plants upside down in the garage for a few more weeks.
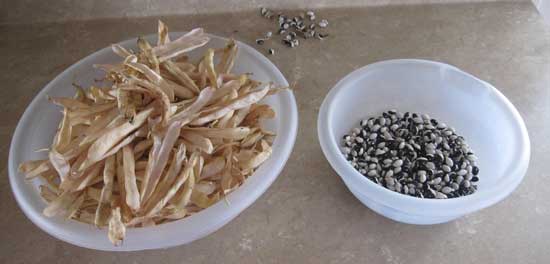
The harvest was relatively small so we shelled the beans by hand. It sounds tedious but went quickly. The pod usually opens when you press the sides of the beans, then just run your finger down the pod to remove the beans. It's easier than shelling peas because the beans are hard. If you have a larger crop you'll probably want to find another way to shell the beans. Putting them in a burlap sack and walking on the sack to thresh the beans seems to be accepted practice and once the beans are threshed out of their pods, the entire burlap bag is emptied onto a screen that has holes large enough to allow the beans to fall through. The image below shows some of the shelled beans.
Dried beans should be soaked before cooking by either a quick soak or overnight soak. Since these beans were fresh they didn't need as much soak time as the dry beans you'd get from a store. They were soaked for a couple of hours, then put in a pot of water, brought to a boil for a minute, then covered and simmered until done. We usually only cook half a cup of beans at a time so they're done in about 45 minutes. The beans lost most of their black and white coloring when cooked.
Dry beans are best kept in a sealed glass container in a cool, dry place and out of the light - we use Mason jars. The beans can be stored up to a year or more as long as they're stored properly. Once soaked or cooked, beans can keep for up to a week in the refrigerator, and they also freeze well.
Each single seed grew four or five pods which had three to five beans per pod on average, so they gave a good return for their cost. We only used half a seed pack and ended up with over two quarts of beans.
Here's a video following the dry beans through their season: