This article contains affiliate links, and any purchases made through those links may result in a small commission.
A cold frame is almost a necessity up here in chilly Zone 5 because the growing season is simply not long enough to grow warm-weather plants like tomatoes, eggplants, and peppers unless they're given a headstart indoors. Before they're released out into the harsh elements however, they need to be hardened off so the outdoor temps and strong sunlight isn't such a shock. That's where the cold frame comes in. Fortunately, a basic cold frame is fairly easy to build, doesn't have to cost a lot of money, and will last for many growing seasons.
Our cold frame is meant for hardening off young seedling transplants, not for growing vegetables through the winter, so it's very basic and doesn't need to be very tall. The cold frame only gets used for about six weeks, then gets moved out of the way until autumn, so aesthetics were secondary to cost.
When building a cold frame, the two lumber choices for the frame are normaly plywood or 2x lumber (2x6, 2x8, etc). Plywood is strong because it's made of several layers (plies) that are glued together and it comes in large sheets, but plywood needs a basic framework of 2x lumber - you can't screw the sheets of plywood together. It also needs the 2x frame because it doesn't have strength to hold hinge screws as 2x lumber does. Plywood would also need to have the edges sealed in some way to prevent the plies from separating if the edges are exposed to the weather for any length of time.
Before building your cold frame, decide what you're going to use for a cold frame lid and build the frame based on that measurement. It can be an old window or door, plexiglass, or pane glass. Be cautious with pane glass because it's the most fragile and can be dangerous to work with. When deciding on the size for the overall cold frame dimensions, make sure it's sized to fit the seed trays (which are typically 10"x20"). Don't forget to add a few inches to the dimensions so you'll be able to grab hold of the flats in order to get them in and out of the cold frame easily. Another note about using glass is that it heats up very, very quickly. You can't leave your seedlings unattended on a sunny day. They make automatic vent openers that open the coldframe lid once it hits a certain temperature, but you'll need to look into the particulars of the opener before building your cold frame. Most entry level vent openers (Amazon) can handle up to 15 pounds and aren't very expensive.
The top of our cold frame uses the glass insert that came from our front entry storm door (I'm guessing it's safety glass, not real glass). It isn't the best solution because it's fairly large and there's no frame to attach hinges to, so it has be slid in and out of place. Plus there's not really any way to prop it open. When the sun gets too strong, it's simply pushed to the side to allow the heat and moisture to escape. Still, it's working very well because it heats up quickly due to the unobstructed glass, and it was free.

The lumber should be fairly easy to find, and for the top of the cold frame you can check Craigslist or yard sales for old windows or doors. If you can't find anything to upcycle for the top, you can always buy plexiglass at Lowe's, Home Depot, or your local hardware store. Plexiglass isn't cheap, but it will last a long time. Lowe's even sells pane glass but as mentioned, glass is fragile and tough to work with.

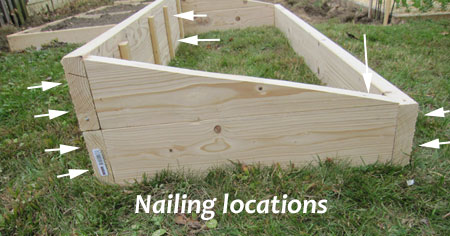
The frame itself is really just a box with two angled sides. The angled sides might be tough to cut if you're not comfortable using a skillsaw. You can cut them with a hand saw, but it won't be easy, quick, or pretty. Maybe you can barter some of your veggie harvest for some carpentry skills. The frame box is made out of 2x6 lumber. The bottom frame is nailed together first. Once the bottom frame is nailed (or screwed) together, add another 2x6 to the rear of the frame and use 1x3 scrap lumber (cut about 10" long) to attach the top board to the bottom board (pre-drill the 1x3s, otherwise they'll split). Once you have the side angle pieces cut, just nail everything together.

Attaching the top will vary depending on what material you're using. Ours just sits on the base because there's no way to add hinges. If you're using an old window or door that has a surrounding wood frame, adding hinges to the frame should be easy. Our materials cost was about $10 not including the top piece (which was free). It's basic, but it works well.
If you don't feel comfortable building your own cold frame or if you don't have access to materials, there are scores of pre-fab models on Amazon, but there's no one best choice when buying a cold frame. You can get a cold frame like this Exaco model which includes three windows, two vents and an automatic opener, or you could start with something basic like this foldable mini-greenhouse model. Decide what the cold frame will be used for (year-round or hardening off), where you'll store it when not in use, what type of material you want (plastic, plexiglass, wood frame, etc.), what size you'll need, and how much you're willing to spend. Don't forget to check shipping costs when comparing cold frames.